Difference between revisions of "Game Attributes"
m |
|||
| Line 151: | Line 151: | ||
:::Else | :::Else | ||
}} | }} | ||
| + | |||
| + | =Video Tutorial= | ||
| + | OneTwo talks about Game Attributes at around 6:38. | ||
| + | <youtube>aQp3irTx25o</youtube> | ||
=See Also= | =See Also= | ||
| Line 157: | Line 161: | ||
[[Category:StarCraft II]] | [[Category:StarCraft II]] | ||
[[Category:Reference]] | [[Category:Reference]] | ||
| + | [[Category:Video Tutorials]] | ||
Revision as of 06:03, 16 May 2011
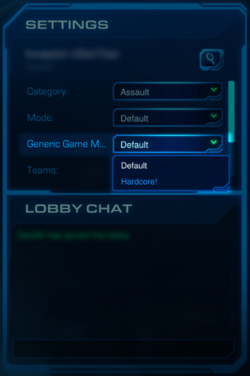
Game Attributes are custom attributes that the player can link to with triggers to help create custom settings in a map. When in a game lobby, these custom "Game Attributes" can be selected in the map's "Settings" on the right of the screen. These attributes also work with Game Variants to essentially allow a map's creator to set various types of playable game modes, possible hero choices for players, and anything else they can think of that they want the player to be able to choose prior to the game starting.
To access this window from the editor, go to "Map > Game Attributes...."
The following will be broken down into the two types of attributes you can modify: Game and Player.
| Related Tutorials | |
|---|---|
|
Game
"Game" attributes are customizable attributes that can be selected in the "Attributes" tab of the Game Variants. These affect the game as a whole rather than a specific player. At the moment, map makers cannot link to default game attributes through triggers, so the best way to work around that is creating your own.
Click the "Add" button on the bottom left to make a new attribute. With your new "Untitled Attribute" selected, go to the "General" tab. Make sure the button next to "Game" is pressed to make the new attribute a "Game" attribute.
General
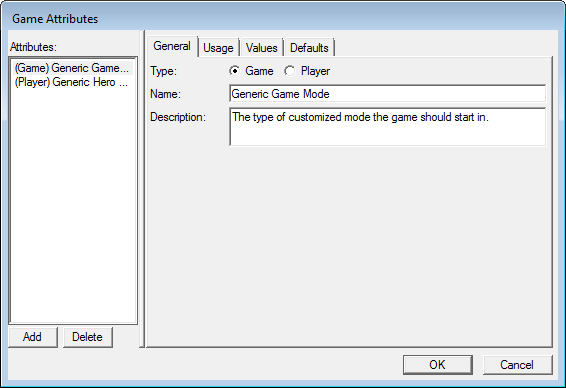
This is the tab that allows you to name and describe your "Game" attribute.
In this screenshot, the attribute is used to set the game mode in the lobby. Now whenever someone plays this map, they can see the "Generic Game Mode" dropdown and select whichever mode they would like to play. Specific values (or "modes") are set under the "Values" tab.
Usage
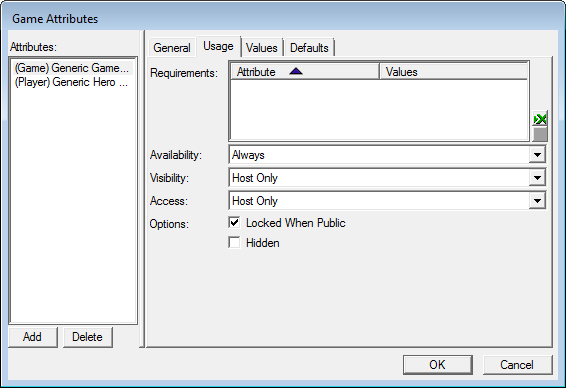
This tab allows you to modify who gets to set this "Game" attribute.
- "Requirements:" lets you add any predefined "Player" attributes that have to be chosen in order to modify this particular "Game" attribute. Basically this means that theoretically in order to select a "Hardcore!" game mode, the player would first have to select a particular pre-defined hero.
- "Availability:" lets you select when the attribute comes into effect.
- "Always" universally applies the game mode so it is always running for anyone who selects it.
- "First Come, First Serve" only applies the "Game" attribute to whomever selects it first.
- "Visibility:" lets you select who can view the "Game" attribute.
- "All Players" lets anyone in the game lobby to see it.
- "Host Only" lets only the game's host see it.
- "None" lets no one see it.
- "Self Only" lets each player see their own "Game" attribute.
- "Access:" lets you select who can access the "Game" attribute (in other words, who can modify it).
- "All Players" lets anyone in the game lobby modify it.
- "Host Only" lets only the game's host modify it.
- "None" lets no one modify it.
- "Self Only" lets each player modify their own "Game" attribute.
- "Options: Locked When Public" locks the value of the "Game" attribute when the host makes the game public. If the box is unchecked, the attribute can be modified as players publicly join the game.
- "Options: Hidden" hides the "Game" attribute from players in the game setup. If the box is unchecked, the attribute will be seen in the game setup.
In this screenshot, there are no "Player" attribute requirements so a player can set the game mode despite their choice of hero. It will apply to all players, but can only be set and seen by the host. The host also has to set the game mode prior to making the game public.
Values
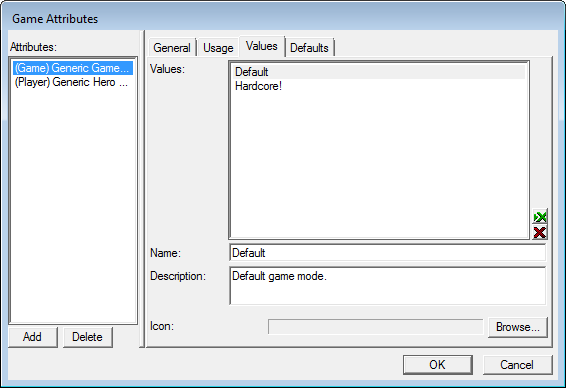
This tab allows you to set the visual representation of the various game modes that can be chosen by this "Game" attribute.
- "Values:" lists the customizable game modes associated with this attribute.
- "Name:" is the name of the value.
- "Description:" is a brief description of the value. This description is not seen anywhere, however, so as of patch 1.1.3, this has no use.
- "Icon:" is a visual icon associated with the attribute. This icon is not seen anywhere, however, so as of patch 1.1.3, this has no use.
In this screenshot, there are two custom game modes set: "Default" and "Hardcore!" Theoretically Default keeps everything normal while "Hardcore!" sets a trigger that reduces health of units or sets some sort of handicap for all players.
Defaults
This tab allows you to set the default "Game" attribute value for each player. You can also lock and unlock these values if you want specific players to be stuck on a certain game mode.
In this screenshot, all players automatically have the "Default" game mode selected, but are able to switch to the "Hardcore!" mode if they wanted since it isn't locked.
Player
"Player" attributes are customizable attributes that can be selected in the game lobby. These are supposed affect each player differently, and would commonly be used to choose a hero.
Click the "Add" button on the bottom left to make a new attribute. With your new "Untitled Attribute" selected, go to the "General" tab. Make sure the button next to "Player" is pressed to make the new attribute a "Player" attribute.
General
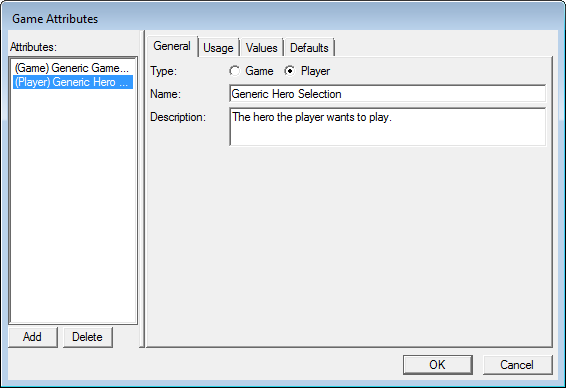
This is the tab that allows you to name and describe your "Player" attribute.
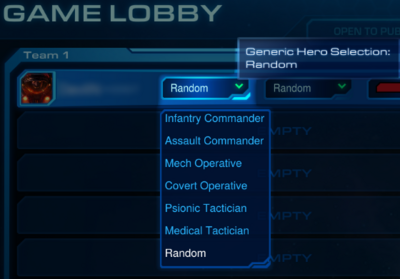
In this screenshot, the attribute is used to select a hero in the lobby. Now whenever someone plays this map, they can see the "Generic Hero Selection" dropdown and select whichever hero they would like to play as. Specific values (or "heroes") are set under the "Values" tab.
Usage
Like the "Game" attribute, this tab allows you to modify who gets to set this "Player" attribute.
- "Requirements:" lets you add any predefined "Game" attributes that link to this particular "Player" attribute. Basically this means that theoretically in order to select a "Hardcore!" game mode, the player would first have to select a particular pre-defined hero.
- "Availability:" lets you select when the attribute comes into effect.
- "Always" universally applies the game mode so it is always running for anyone who selects it.
- "First Come, First Serve" only applies the "Player" attribute to whomever selects it first.
- "Visibility:" lets you select who can view the "Player" attribute.
- "All Players" lets anyone in the game lobby to see it.
- "Host Only" lets only the game's host see it.
- "None" lets no one see it.
- "Self Only" lets each player see their own "Player" attribute.
- "Access:" lets you select who can access the "Player" attribute (in other words, who can modify it).
- "All Players" lets anyone in the game lobby modify it.
- "Host Only" lets only the game's host modify it.
- "None" lets no one modify it.
- "Self Only" lets each player modify their own "Player" attribute.
- "Options: Locked When Public" locks the value of the "Player" attribute when the host makes the game public. If the box is unchecked, the attribute can be modified as players publicly join the game.
- "Options: Hidden" hides the "Player" attribute from players in the game setup. If the box is unchecked, the attribute will be seen in the game setup.
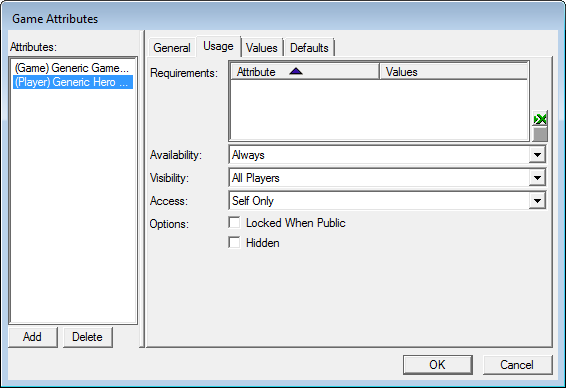
In this screenshot, there are no "Game" attributes linked to the values. It will apply to all players and can be seen by all players, but can only be set by the player it affects.
Values
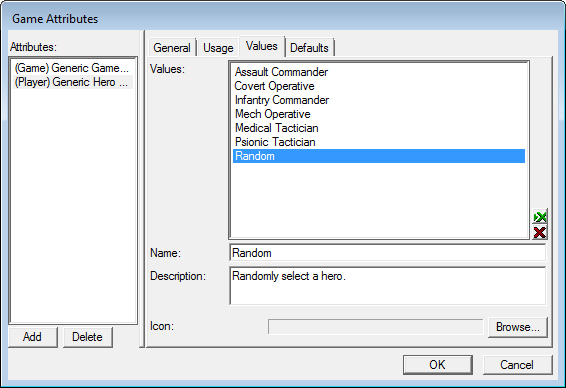
This tab allows you to set the various options that can be chosen by this "Player" attribute.
- "Values:" lists the customizable options associated with this attribute.
- "Name:" is the name of the value.
- "Description:" is a brief description of the value. This description is not seen anywhere, however, so as of patch 1.1.3, this has no use.
- "Icon:" is a visual icon associated with the attribute. This icon is not seen anywhere, however, so as of patch 1.1.3, this has no use.
In this screenshot, there are seven hero choices available. Theoretically choosing one in the game lobby will start the player with that hero, while selecting "Random" will start the player off with a randomly selected hero. Again, these values can be linked to triggers for these choices to take effect.
Defaults
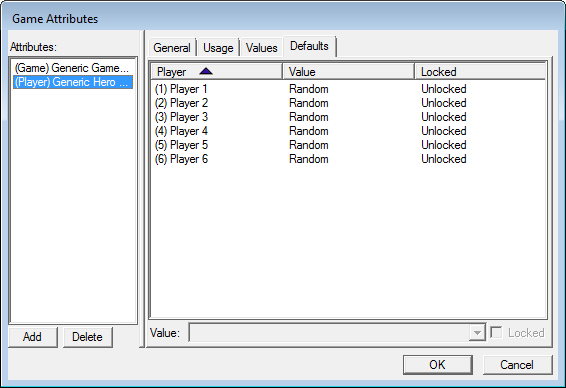
This tab allows you to set the default "Player" attribute value for each player. You can also lock and unlock these values if you want specific players to be stuck on a certain game mode.
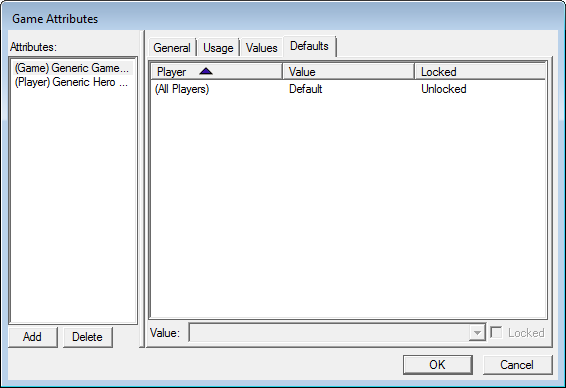
In this screenshot, all players automatically have the "Random" hero selected, but are able to switch to the others if they wanted.
Custom Game Attributes in Triggers
If you want to make any use of your custom attributes, you need to detect them in triggers. That is done via Attribute Game Value or Attribute Player Value functions (they both return Attribute Value variable type). This function simply takes the desired attribute as parameter (in the GUI list of attributes, there are all standart atributes, including obsolete attributes, like Teams[2 Teams] for backwards compatibility, don't use those). This value can then be compared with simple IF or SWITCH to provide with the effect this attribute. Example trigger:
Map Initialization
None
None
General - If (Conditions) then do (Actions) else do (Actions)
- If
- (Custom Difficulty value for player 1) == Impossible
- Then
- Game - End game in Defeat for player 1 (Show dialogs, Show score screen)
- Else
- Then
- (Custom Difficulty value for player 1) == Impossible
Video Tutorial
OneTwo talks about Game Attributes at around 6:38. <youtube>aQp3irTx25o</youtube>
