Difference between revisions of "How to make StarCraft II Assets"
m (→What You Need) |
|||
| Line 17: | Line 17: | ||
*[http://www.xnormal.net/1.aspx XNormal] - XNormal is a free normal mapping program with 3D Studio Max and Maya support. | *[http://www.xnormal.net/1.aspx XNormal] - XNormal is a free normal mapping program with 3D Studio Max and Maya support. | ||
*[http://www.crazybump.com/ CrazyBump] - CrazyBump is not free, but it's quite well featured and you can get a trial version for free. | *[http://www.crazybump.com/ CrazyBump] - CrazyBump is not free, but it's quite well featured and you can get a trial version for free. | ||
| + | |||
| + | And for high polygon sculpting, you can use Blender's sculpt, or one of these programs: | ||
| + | *[http://www.sculptrist.com Sculptris] - Sculptris is a free sculpting program | ||
| + | *[http://usa.autodesk.com/adsk/servlet/pc/index?id=13565063&siteID=123112 Mudbox] - Mudbox is a professional tool which has a trial version. | ||
| + | *[http://www.pixologic.com/home.php ZBrush] - Zbrush is made by the same makes of sculptrist, and is their professional scultping program. It's the industry standard at the moment. | ||
= Models = | = Models = | ||
Revision as of 03:27, 23 August 2011
This tutorial doesn't show detailed artistic processes for whichever art programs you use. You can find out how to make 3D and 2D artwork through experimentation and other tutorials online, but that is beyond the scope of this article. It does, however, show in detail how to get your model into StarCraft II's model format, and have it textured and complete. It doesn't show sound creation, as that will be covered in How to make StarCraft II Sounds.
What You Need
Currently, you need to have 3D Studio Max, and NiNtoxicated's .m3 import/export plugin. You also need a 2D image editing program, such as GIMP or PhotoShop, and its corresponding .DDS plugin. And, of course, you'll need StarCraft II, and you'll need to know how to use the basics of GalaxyEdit.
You can get a full student edition of 3D Studio Max if you don't use it for commercial purposes and are currently studying. You do not need an .edu email address for it. It will last for 3 years before expiring, by which time there will probably be several new versions to get student editions of; this is the only limitation, although I doubt you get customer support either.
What You Could Have
Alternative 3D modeling programs which you may find easier to use, but which can't currently export to .m3, exist.
- Blender 3D (Free) - Blender is the most powerful free 3D modeling program available. It can also import .m3 models, although it can't export them.
- Maya - Maya is an industry standard, often used in the movies and games industries. It's also very expensive, but you can get a student edition for free, same as 3D Studio Max.
- LightWave - LightWave has a thirty-day trial, and is relatively cheap at $895 USD.
And there are many others, which you can find out more about yourself.
You could also do with a normal mapping program. GIMP and PhotoShop both have normal map plugins, and there are also two other normal map programs commonly used:
- XNormal - XNormal is a free normal mapping program with 3D Studio Max and Maya support.
- CrazyBump - CrazyBump is not free, but it's quite well featured and you can get a trial version for free.
And for high polygon sculpting, you can use Blender's sculpt, or one of these programs:
- Sculptris - Sculptris is a free sculpting program
- Mudbox - Mudbox is a professional tool which has a trial version.
- ZBrush - Zbrush is made by the same makes of sculptrist, and is their professional scultping program. It's the industry standard at the moment.
Models
As previously said, we won't cover the artistic process in detail as the process varies from tool to tool and books can and have been written on the subject. However, there are a few things to keep in mind when you do create your models.
- Don't go overboard with polygon amount. StarCraft II models are generally less than 10000 polygons. You can go higher for models which are rarely on screen, and in small numbers, but keep in mind that people may not have as nice a computer as you. For doodads and units, try keep it under 3000 or so.
- If you're making models for RTS maps, don't bother with much detail on the underside of the model. And keep in mind that if it's RTS, the players probably won't get close in much, so texturing individual pores on that orc is totally unnecessary.
- StarCraft II only supports triangle and quad polygons. Try to model using only one or the other. I find triangles are great for organic surfaces, and quads are best for inorganic shapes.
Getting your model into 3D Studio Max
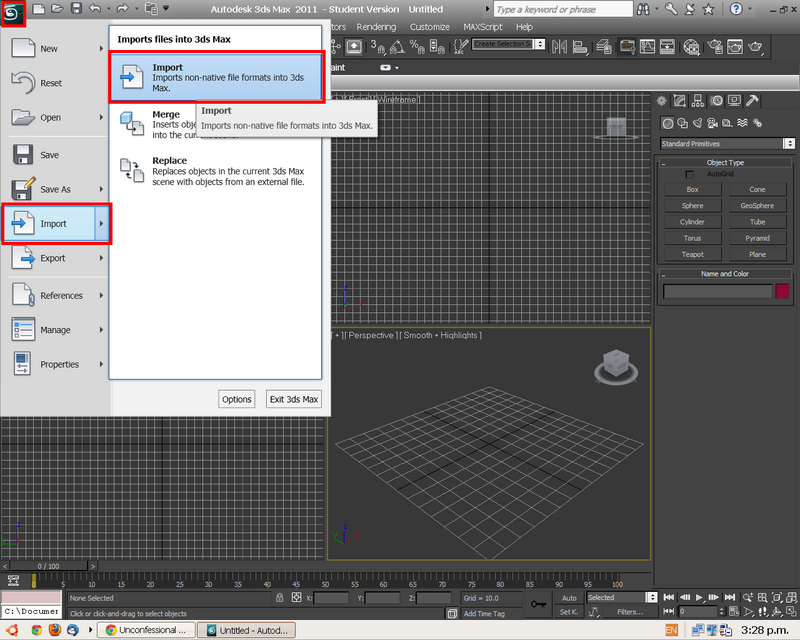
Currently the only working method to get custom models into StarCraft II is to convert them using 3D Studio Max's .m3 plugin. This step assumes you have access to 3D Studio Max. If you created your model in 3D Studio Max, you don't need to follow this step.
- Step 1: Convert your model to a format 3D Studio Max supports. These include .3DS, .FBX, .DAE, .LS, .OBJ, and .WRL, among others. If your chosen modeling program doesn't support exporting to any of these formats, you can use programs such as Blender to convert your model. I recommend COLLADA (.DAE), as it's fairly universally supported.
- Step 2: Import your model into 3D Studio Max.
Prepare for Export
This is where the fun stuff starts. We need to make sure your materials are applied to the model correctly. For the most part, this is the main preparation you need to do.
Step 1
Open the Slate Material Editor. It's found at Rendering->Material Editor->Slate Material Editor. Now, the Slate Material Editor is fairly similar to Blender's node editor, although more limited. The basic system is that you have a final material which is composed of numerous maps. You link the maps together and finally into the material, using the little circles on the sides of the maps. The system is fairly easy to get used to and quite powerful. If you need more explanation you can check out this video: <youtube>xnjozpKK7Fg</youtube>
Step 2
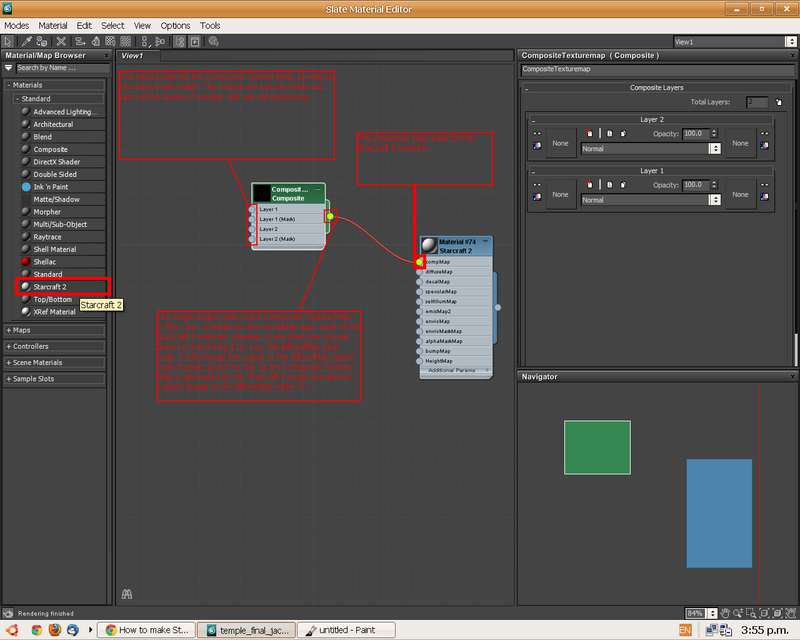
Using the Slate Material Editor, we'll make our StarCraft II Bitmap, composed of our previously created textures. First, double click the StarCraft II material on the left.
As you can see, a new material has been added, called Material #74 (StarCraft II). To the left of it, there's a linked map called a Composite Texture Map. This takes two inputs and outputs one image, which then continues into the StarCraft II material in the CompMap slot.
Step 3
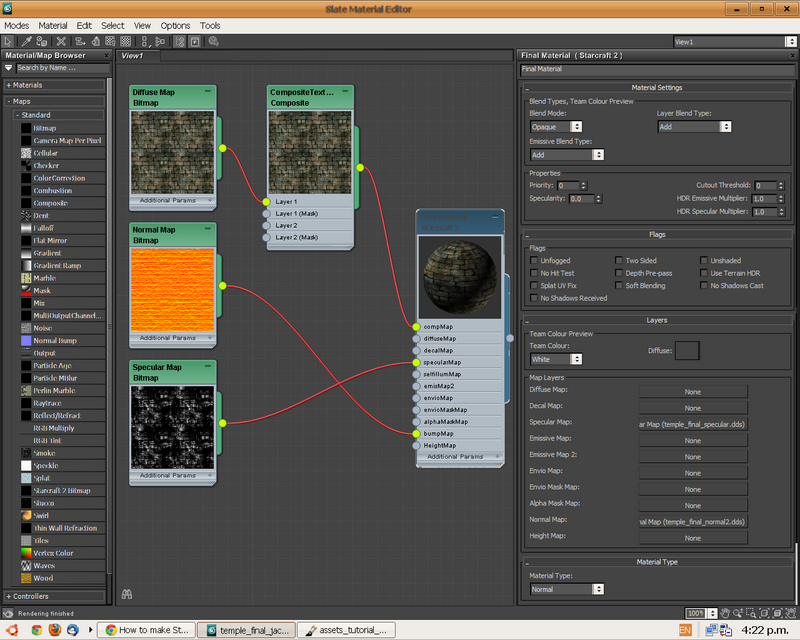
Next we're going to add a diffuse map, a normal map, and an specular map. We'll then link these into the StarCraft II material. On the left again, open up the Maps tree by hitting the + sign next to it. Then double-click the StarCraft II Bitmap entry. You will be prompted to locate an image. Choose your previously created diffuse map. A new map is then added to the area in the centre. Do this two more times, but choosing your normal map and specular map instead. (Note: We don't use the Normal Bump option because the StarCraft II material lets us use a bitmap instead. The only advantage I know of for using a StarCraft II Bitmap over a standard Bitmap is that you can use OGV videos as textures; in fact, in this screenshot I actually used standard bitmaps.)
Then drag the output nodes to the corresponding input nodes. The only exception is the diffuse map, which you drag to the Composite Texture Map input node.
Step 4
We're almost done. When you double-click the StarCraft II Material, over on the right, there are numerous options related to exactly how the material will apply to the model. A few important ones are the blend mode, the specularity amount, and the HDR multipliers. Blend mode should generally be set to opaque for most units. If you want to make a ghost unit, change this to Add. Specularity amount may need a bit of testing to get it just right for your texture. You may need to put it up quite high to get the correct amount of "shine" on your texture. And the HDR multipliers control how bright the lights and reflection and flashy annoying stuff will be. Mostly you'll leave these the same but in case you're a fan of crazy unrealistic but flashy effects, you'll want to throw these up a bit.
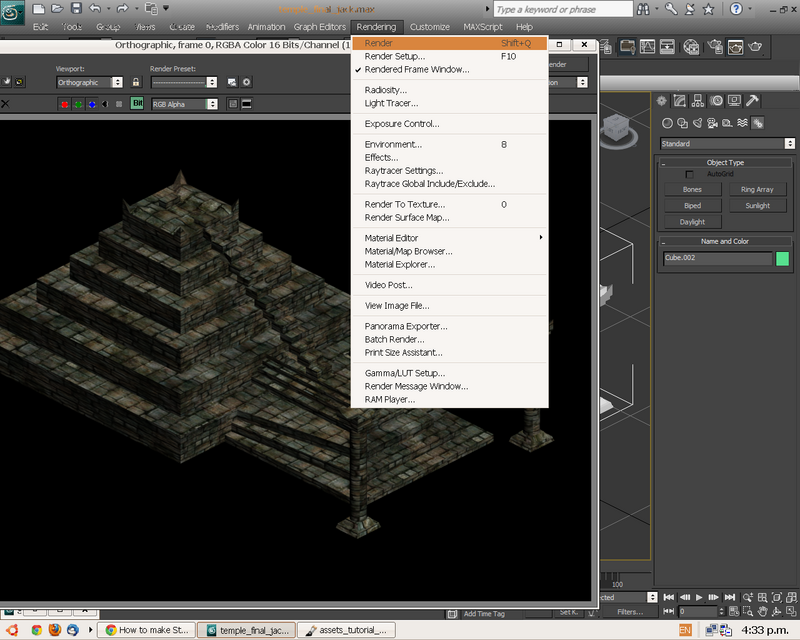
Finally, you need to apply the texture to your model. Go back to the 3D viewport by minimizing the Slate Material Editor, and select your model. Then go back to the Slate Material Editor and right-click the StarCraft II Material. In the box that pops up, choose Assign Material to Selection. Go back to the 3D viewport and give it a test render. If everything was done correctly, you should now have a textured model. Keep in mind that what you see in the render may not be exactly what you see in StarCraft II, so you'll need to do a final test in game before releasing your model.
Finally, select the model, right click it, and go to Convert To:->Convert to Editable Mesh.
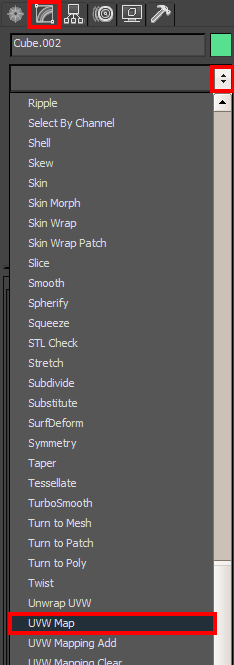
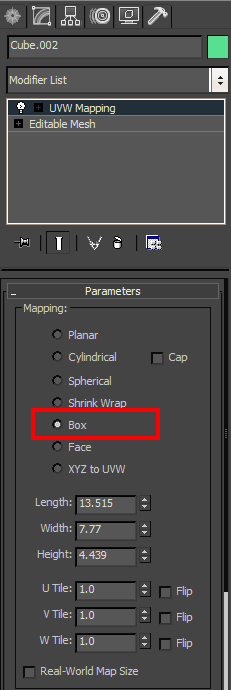
Note that in this case I had already UV mapped the model to a certain extent. If you haven't done the same, your texture may look weird. Don't worry, if UV unwrapping is too difficult for you at the moment, you can use one of the default UV mapping methods 3D Studio Max has.
Exporting
Finally after making sure 3D Studio Max imported everything correctly, and applying the materials correctly, you can export the model into .m3 format and get it into StarCraft II! Happily, this step is easy enough, as long as everything goes according to plan. (NOTE: This assumes you've already installed NiNToxicated's m3 plugin for 3D Studio Max, as per the instructions included with the plugin. If you haven't already got it, you can grab it here.
Step 1
Over on the right side of the screen, there's a hammer icon. Click it, and on the pane that appears, choose MAXScript. In the dropdown box called Utilities, choose M3 - Export.
The texture path is where your model will look in the map for its textures. By default, you need to import your textures into /Assets/Textures/ using the Import Module. If you like you can change this to a different folder, or erase it so you can import your textures into the map without moving them into a different folder. Anyway, hit Export, and if everything works properly, your model should soon be exported. To find out how to import it into StarCraft II and use it, check out Importing Custom Models.
Textures
We also won't cover this step in detail in terms of artwork. However, the technical details are simple enough to remember.
- In general, use a maximum texture size of 1024x1024.
- Textures have to be a power of two for compression to work. [NOTE: Non-power of two textures may work in StarCraft II; needs testing.]
- Use the .DDS format, rather than the TGA format, as TGAs are generally larger than DDSs.
- Use DXT5 compression for DDSs with alpha maps; use DXT1 for DDSs without alpha maps. This is because DXT5 has the best alpha map quality preservation of all the compression methods, whereas DXT1 doesn't have alpha maps, and is the best compression method for non-alpha maps.
Normal Maps
StarCraft II uses a fairly odd version of the normal map, which is orange tinted rather than blue. To convert your normal map to the orange SC2 normal map, you have to edit the channels. In PhotoShop, select the red channel, copy it, and paste it into the alpha channel. Then fill the red channel with white, and the blue channel with black.
The process is slightly more difficult in GIMP. First, add an alpha channel if one doesn't already exist. Second, select the entire image; then go to Colors->Components->Decompose. In the box that pops up, choose RGB and press OK. This then places the channels into separate layers. Select the red layer, copy it, and paste it into the alpha layer. Then fill the red layer with white, and the blue layer with black. Finally select all the layers and go to Colors->Components->Recompose. This then places the layers back into one layer on your original image. It should be orange-tinted if you did it correctly. [NOTE: there's an alternate and more official method for GIMP as shown here.
