Difference between revisions of "Triggers"
m (1 revision: StarEdit.net Wiki) |
|
(No difference)
| |
Revision as of 06:16, 21 November 2010
A trigger is an event in StarCraft II that allows you to control almost everything inside the game. By setting an appropriate event, some acquirable conditions, and a few actions, you can easily make anything change or happen.
Trigger Window
The first thing you need to know about the trigger editor, is how to open the window. There are a couple ways to do this.
- Pushing F6 will open the window for you.
- Going to Modules > Triggers
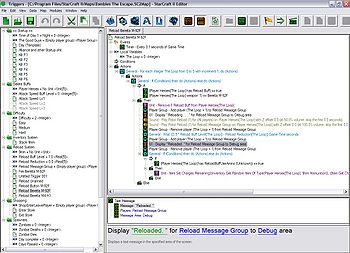
Now that the trigger window is open, you'll see quite a few areas.
The picture on the right could be what your trigger window may look like, depending on how far into a project you are.
Basics
There are four main parts to a trigger:
- Events: An event is what must happen before a trigger can run. You'll find plenty of these, such as "A unit enters an area", "A unit is attacked/Killed", "A Player pressed a Key", and plenty of other. What this means is that any time this event occurs, this trigger will run and perform what it was written to do.
- Conditions: It wouldn't be sensible to have all types of one event always run a trigger, even if we don't want it to. For instance, we may want a trigger that only runs when a player has a unit in an area and that unit is killed. If we do either event, it wont check to see if the other one is met though. This is why conditions were made. They are simple comparative statements that must be true to let the trigger continue to run. In this case, we could say to run the trigger on the event that a unit is killed, and the condition that the unit is in the specified area.
- Local Variables: Remember back to algebra class, when we would say that X is some variable for an unknown value? This is the same concept, except that we specify it's contents, which can range from numbers to units to triggers to... just about anything! In fact, there are about 70 different types of variables, all for some sort of data in StarCraft II. These are also local to each trigger, meaning each one can only be used inside of whichever trigger it was created.
- Actions: Actions are what are performed assuming both the event runs the trigger and the conditions are met to allow the trigger to continue. These can be anything from doing actions with units, with resources, with the camera, the game, the environment, you name it. Pretty much anything in the game you can think of can be changed with these actions.
Triggers are run in the given order, Events -> Conditions -> Actions. An event must start the trigger, it's conditions must pass, and then the actions can take place.
Creating a sample trigger
By right clicking the area on the left, some options will appear, such as making a new trigger or variable. These are the two basic things you need to know about when it comes to triggers.
Start by making a new trigger by right clicking, going to New, and then New Trigger. You could also push CTRL + T to achieve the same thing. To name your trigger, right click the new trigger in the area on the left, then viewing its properties (Element Properties, or CTRL + Enter is the hotkey).
Now that the trigger has been made, you'll need an event to trigger this trigger. Try a simple event first, such as a key stroke. Right click the top right area of the window, then go to New, and then New Event (or CTRL + E). Double click on Key Pressed, and the event will appear under your events. In the bottom right area, both in the white space and grey area your event will appear. Choose your fields wisely, such as the key to trigger the trigger, and the player that can trigger the event. Use the allow function for any of the other keys to make unique hotkeys in game, such as ALT + G to make a grenade ability. For now we'll do something simple to just make a functioning trigger.
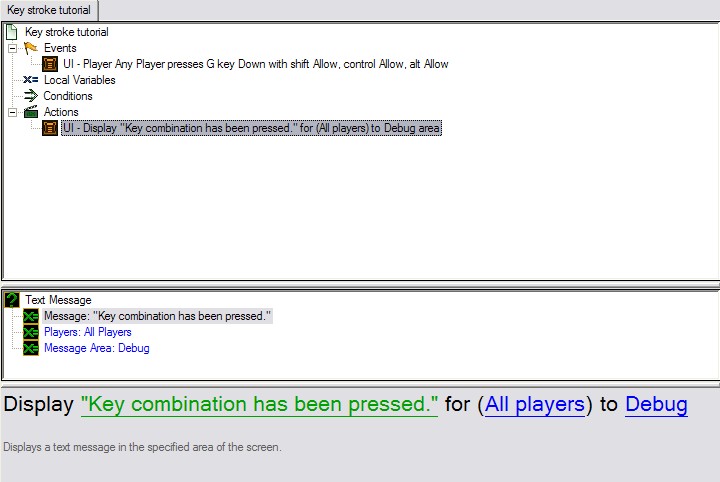
Now we need an action. Conditions are optional, but most times needed to make a functioning trigger. For this we wont need one. Right click the top right area again, go to New, then New Action (or CTRL + R). Type 'Text Message' into the find box at the top, then double click on 'Text Message'. Now input data into the fields, such as All players for the player input section to make the trigger display the text message to all players. Next make it say something informative, such as "Key combination has been pressed.", and then choose an area where to display the text. If you wish to mimic SC1's text style, choose 'Debug'.
When finished it should look something like this:
Now enter StarCraft II and test your new trigger, and ensure it does only what you want it to do.
Trigger Window Hotkeys
- Ctrl + T creates a new trigger.
- Ctrl + E creates a new event.
- Ctrl + K creates a new condition.
- Ctrl + R creates a new action.
- Ctrl + B creates a new variable.
- Ctrl + W creates a copy of the selected 'type' if on the left menu. For example, if you currently have a Variable selected, it'll create a new Var. It does the same for Folders, Triggers, etc. If in the right menu, it'll either create a new Event, Condition, Variable or Action based on the field you have selected. This is a very useful hotkey, as you can see.
Intermediate Triggering
Variables
Variables are more then necessary in your map, unless you plan on making a regular melee that is. When making a variable you must remember that there are multiple types, each corresponding to a specific element in StarCraft II.
When making a variable there are also many ways to create one, locally and globally. Both function the same way, but local variables can only be accessed by the trigger in which it was defined.
To create a variable, right click the left area in the Trigger Window, go to New, then New Variable (CTRL + B). Now you need a type, a name, and sometimes a value or configure it to be an array. Types go from Units, to Player Groups (Forces), integers (number with no decimal) and reals (number with decimal), and most objects dealing with leaderboards and dialogs. An integer is a great way to store information needed in triggers later on, and SC1 veterans who know Death Counters will understand them rather easily.
Writing to a variable is as simple as making a new action, and choosing the option that first comes up, which is 'Set Variable'. When setting a variable, the editor will automatically populate the list with reasonable things to put into it.
When reading a variable, conditions vary. Bringing a unit to a location can also be done by bringing a variable to a location, if the unit is inside the Unit variable. Even math can be done, in the math section of the conditions list, to variables containing numbers and can allow you to do more things in only one trigger.
Useful Trigger Info
Using the Order action
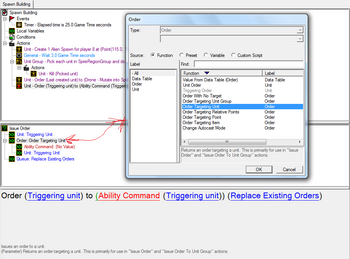
To effectively use the order action such as in SC1, simply double click 'Order with no target'. A menu will appear that shows quite a few more options. By placing a point somewhere on the map, then selecting 'Order targeting point', you can order a unit to attack, patrol, or whatever you feel like making said unit do to that position.
Remember pathing is an issue, and blocking a route will make the unit attempt to find an alternate route to the target point rather than attacking everything in its path.
Triggers "switches"
Wondering how to activate/deactivate a trigger just like we used to do with Switches/DCs in StarCraft I? It's fairly simple. Just be aware that "Run trigger 'x' (Check/Don't check condition, Wait/Don't wait until it finishes)" and "Turn 'x' trigger On/Off".
If you feel very nostalgic, you can have any Event you want, and set the condition to something like "var i == 1". Like this, whenever you want the trigger to run, you set the var i to 1. Don't forget to reset i to 0 once the trigger has executed.
References
The Galaxy Editor lets you choose quick and useful references such as "Picked unit/integer/etc." (used along with "Pick each" action), "Current trigger", "Triggering unit/player" (in reference with the Event), etc.
Arbitrary list of the most used trigger actions
- Create Revealer: Reveals a specified part of the map for specified Players.
- Create Units With Default Facing: Self-explanatory.
- Issue Order: Self-Explanatory. Can be used to create AIs.
- Modify Variable: Use this to do mathematical modifications on variables (things like "i+1=i")
- Pan Camera: Centers the screen view on a specified region/point.
- Pick Each Integer: You choose the 2 extremum integers. Use this along with "Picked integer".
- Select Unit: Self-explanatory. Very useful to enhance the gameplay and professionalism.
- Set Alliance: Self-explanatory.
- Set Camera Bound: Limits the Players from moving their camera outside of the boundaries you've selected.
- Set Variable: Self-explanatory.
- Remove Unit: Self-explanatory.
- Run Trigger: Lets you order the run of another trigger.
- Text Message: Displays a text message in the specified area (Chat, Debug, etc.) for a Player Group.
How to use Conditions to filter Events
Wondering how to do things more specific than simply "Any unit enters 'region'"? You'll have to use Conditions.
For example, if you want to know when any Marine of the Player 2 enters the region named 'NO U', here's what you'll have to do:
Event: Any unit enters 'NO U'
Conditions:
    - Triggering Unit Type == Marine
    - Triggering Player == 2


