Creating a unit from scratch
Creating a Unit from Scratch
Background Information
The modular way that the Data Editor (and much of the Galaxy Editor) functions adds a lot of functionality to the way you can do things.
In plain english, it is easy to think of the Galaxy Editor as a box of puzzle pieces. Once created, you can slot these pieces together to create pretty much whatever you can think of...
In the World Editor
For example and comparison, in the World Editor of Warcraft3 - you created a Unit. This unit had everything a unit has, it had a model, a scale, tinting, stats: like life, mana, regeneration, projectiles (if applicable), attack types, damage range, attack speed, movement speed, movement type, if it was a hero or not, it's attributes etc... and an endless array of other settings. It was a simple case of creating the unit, and then changing it to suit your needs. If you wanted a Tower (in your Tower Defence) you would copy a Cannon Tower and edit it endlessly... If you wanted a new unit, you would recreate a Grunt or a Footman and edit it endlessly...
In the Galaxy Editor
If you want to create a Unit, it is very simple. Open the Data Editor, go to the Unit layer and press Ctrl+= to create a new object. There, you have your unit. Here you can decide things like the unit's name and it's ID. These fields are very important for how this piece of the puzzle looks. As a handy sort of 'wizard' function you can opt to 'copy' the unit from data held by another already created unit.
The Tutorial
Below is a step to step guide to get you started in the Data Editor. Happy reading.
Creating our Unit Object
So, lets open up the Data Editor [F7]. I am a massive fan of 'hot-keys', they make you work 10x faster. Fact.
Next up, let's make sure we're all learning from the same page. There are a couple things you have to do - 'customizing' your data editor to make it look like mine. Note: This is just a matter of preference, but I find this setup is the most efficient.
In your Data editor, you will see these buttons, just to the centre-right of the upper part of the screen. You will want to click the ones highlighted in red down. I am also a massive fan of high-lighting.
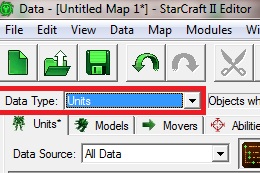
With this complete, lets get down to brass tax. Due to the Galaxy Editor being modular, it works in layers. Sort of like an onion. We want to enter the 'Unit Layer' now.
- You should see a list of all the units in StarCraft II now. Right Click there and say 'Add Object'... Or, even better, use the 'hot-key' of Ctrl + =.
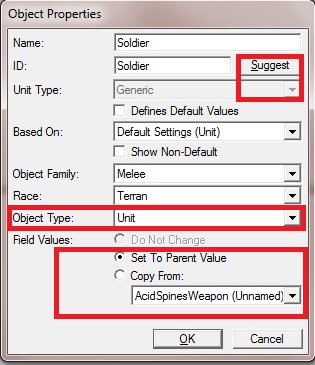
- So, let's create a unit and call it Soldier. Hit 'Suggest', this will (or should) auto-fill the ID field as Soldier.
- The next thing you want to do, change the 'Object Type' field to a Unit.
- You can fiddle with the Race and Object Family options too. My Soldier is a Terran unit and belongs in the Melee category.
- Name: What the Unit is called. For example: Zealot or Hydralisk.
- ID: What the Unit is called in the Editor. This is important. Usually we will use the 'Suggest' button to keep things simple and ordered.
- Unit Type: This has to remain at Generic. I presume later patches to StarCraft II will add more functionality here.
- Based On: Since we are creating our unit from scratch, we can just use the 'Default Settings' for a unit.
- Object Family & Race: This is mostly for organizing it in the Editor, placing it in the correct category etc. Also good practice, you don't want a Terran Marine unit you have created to be a Zerg race. It would just be unprofessional :).
- Object Type: We are making a Unit in this tutorial. For example, we could make it a structure and it would have all the relevant fields for a building instead.
- Field Values: This is handy for copying or emulating another type of unit. But, we are creating ours from scratch, so we'll set it to the 'Parent Value'. This effectively means we are creating a Blank Canvas.
Creating an Actor Object for our Unit
A Unit requires an Actor. An actor is what used to be the 'Art' fields in Warcraft 3.
Now you can go back to your Terrain layer, and open up the Unit's tab (Right click on the terrain and press 'U'), if you search for Soldier, it will be there - because you just created it. However, if you were to place this Unit on the Terrain, nothing would show up. Yes, it would be there, but you wouldnt be able to see it. That is because, this Unit you created does not yet have an Actor...
Head back to the Data Editor and venture into the Actor layer. Hit "Ctrl + =" to create a new object here. Call it Soldier and hit suggest. You want the next field to be set to 'GenericActorBase' - I am not entirely sure, this is just the category you want it to be in - OTHERWISE, it WONT WORK! And for speed and efficiency (a rare commodity in the Galaxy Editor) you can base this Actor off of the Marine actor (which already exists).
The 'copy from:' field is extremely useful. Some map-makers will say it is a cheap short-cut. But they lie. All map-makers use this. What this will do, is instead of creating a completely new actor (which would in effect be nothing to start with). It will create an Actor Object called a Soldier Actor - but it will pretend that this Soldier Actor is a Marine. And so we will have a new Actor, which is identical to the Marine.
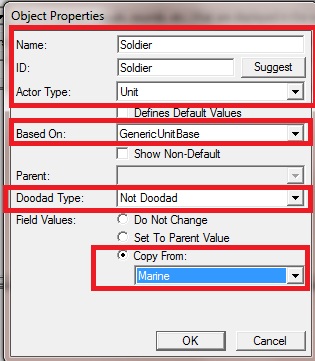
 This is what it should look like.
- Name, ID & Actor Type: This is very much as we did for creating the new unit. The Actor Type is Unit since we want it to function like a unit (movement animations, attack animations, idle animations and so on).
- Based On: Remember before, in the creating of our Unit object - we had to leave the Unit Type field as Generic? Well, because of this, we need to base our Actor object on GenericUnitBase for it to apply to our Generic unit Object. I won't bore you with the why's and how's of this. It's just the way it works!
- Doodad Type: This is similar to the Race and Family fields for the Unit creation. You could make our unit a Cliff/Ramp object - but then it would only show up in the Doodad layer and would not function like a unit. So, we'll make ours 'Not Doodad'.
- Based On: For speed and efficiency, we'll base this unit off of the Marine. What this means, is our Unit will look just like the Marine. Instead of creating a completely new actor (blank canvas) and painting it like a Marine - which would take ages.
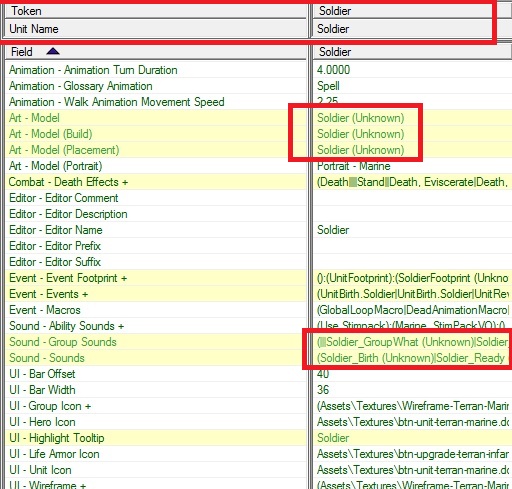
Now you have your Soldier (Actor) but, since we based it off of the Marine (Actor), it is still 'linked' to the Marine. To follow the analogy of a puzzle, this piece of the puzzle that we just created Soldier (Actor) is shaped so that it can only fit to the Marine (Unit) piece. We want to change that. At the very top of the field on the right, you will see something like 'Token Unit:' and then Marine. Go ahead and edit this field, you will see a list of all the units in the game, try and find your Soldier there. Once you have done this, the panel beneath should look like this:
But, all of those highlighted instances are now incorrect. Because, when you change the Token value - or what the Puzzle Piece can attach to, the piece doesn't automatically move itself to the correct place. So right now, we have a square shaped (Soldier) puzzle piece, which is still attached to a circle shaped (Marine) piece. Edit what I have highlighted in Red to point to the Marine unit. The Galaxy Editor thinks, that because we have a Soldier Actor, that there must be a Soldier Sound-Set and a Soldier Model and a Solder Portrait and so on... But, since our Soldier is effectively a Marine - all we need to do is change those fields to point back to the Marine.
If you placed the Soldier in the Terrain Layer previously, but didn't see anything there, go look again. Now that your Soldier has an Actor (which is essentially a copy of the Marine), you should see a shiny marine model standing there, albeit, now called a Soldier...
Adding Movement & Stats to our Unit Object
For those with keen observational skills - you will notice that our Marine has no attack, he cannot move and only has 1 hit-point. In this section we will modify our unit so that he can run around and survive a couple of hits!
Remember before, I showed you how to alter the way your data editor looks. We will want to change it into the Table View & also show Advanced Fields. Since our Unit was created from scratch, he doesn't know how to use his legs and has no abilities.
To be as efficient as possible while navigating around the Data Editor - you will want to frequently switch between Table View and display/hide the Advanced Fields. Over time you will learn when you need to see all the Advanced Fields for a unit, and when the Table View is more effective than the List view. It is a matter of preference.
Now that you are in the Table View, and you have added the Advanced Fields - you should see EVERY possible thing there is to a Unit. These include Behaviours (like Buffs from Warcraft 3), Abilities, Combat etc...
We want to start off in the Movement section. Note: You can do this in the List View, but it is sometimes easier to have everything categorized as it does in the Table View.
- Acceleration: This is how quickly the unit reaches his top speed. Almost all Units in StarCraft II have an Acceleration of 1000. Try setting this to 0.5. What it actually means is, when this unit is standing still and then ordered to move - he will move at 0.5 speed for 1 second, then 1.0 speed, then 1.5 and so on until it reaches it's maximum speed.
- Collide: What will bump this unit around or what will this unit bump around. Place 100 Zerglings on a map and then move a marine through them. Unless they are Holding Position, they sort of 'make way' for the Marine to pass. Set this to Ground.
- Creep Speed Bonus: This adds a numeric bonus to a units speed if it is on Creep.
- Creep Speed Multiplier: This adds a percentage bonus to a units speed if it is on Creep. Try setting this to 0.5, so when our Soldier runs around on Creep he will only move at half his speed.
- Deceleration: The opposite of Acceleration. When a unit is given an order to run to Point A. When he gets close to Point A he will start slowing down according to his Deceleration rate.
- Inner Radius: This is similar to collision - except with Buildings only. Set it to something small like 0.375
- Lateral Acceleration: This doesn't really apply to a Marine. Set it to about 50. It's what the Default Marine unit usually has.
Next off, we will want to make our Soldier (Marine) a little more combat-effective... Let's switch back into List View for this part.
The fields we are going to change come under 'Stats -'
- Life Maximum: Lets make our Soldier a bit stronger than a Marauder. So about 150 to 200hp will do nicely.
- Life Starting Value: Typically, units start at maximum life, so put this to whatever you chose to put your Life Maximum field to.
- Life Armor: This gives our Soldier some armor, set it to 2 or 3. Or whatever you like!
- Life Armor Level: This does nothing. Apart from edit the armor icon on the unit to show an upgrade level. Keep it blank
- Sight Radius: This is how far our unit can see. If we kept this at 0, our unit will not give any vision - which is a little bit pointless! He wouldn't be able to attack, since he can't see anything. Put this to about 8.
Finally, we need to add abilities to our unit. And onto it's corresponding 'Command Card'.
Next Steps
This section is still being written. Please search for a Weapons tutorial or more information on Abilities
Go back to Table View, or in the List view find 'Combat - Abilities +' field. Let's add two abilities to our Soldier... Both Walk and Attack.
Next we want to show these abilities on his 'Command Card'. So, 'Combat - Command Card +', just give him two buttons, and link these buttons to the ability commands that we just gave him! Simple! This is part 1 finished.
Next I will add information relating to Weapons and Upgrades to go with your unit.


