Publish
Publishing your map can be hard when it's your first time.
Step-by-Step
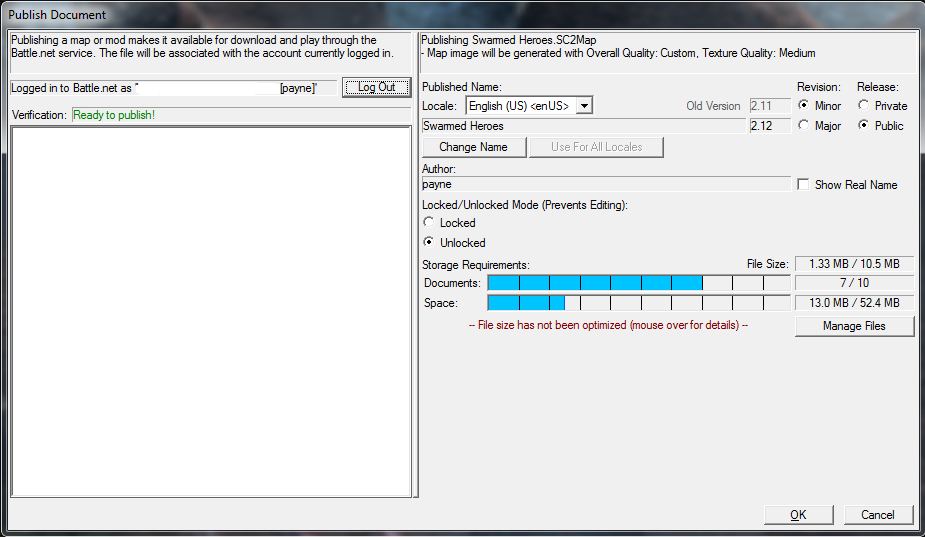
This is just a quick step-by-step presentation of how to publish your map. If you are searching for more informations as of each different field presented in the screenshot above, see the "Publishing" section just below.
- Ctrl + S
- Alt + F
- Alt + B
- Log In
- Select Locked or Unlocked (we personally recommend leaving your maps unlocked)
- Select the Revision and Release status
- Press Ok
Publishing
First of all, make sure your map is saved before entering the Publishing window: it is a requirement for your map to be published.
The Verification encase will be green if everything's alright. If it appears red, there should be a list of errors just below it. Fix these errors and you should be able to publish properly.
The Revision is there to let you choose the version number of your map: a Minor update adds ".1" to the version number while a Major one will add "1" and reset the minor numbers to "0". So if you're at version "2.12" and choose a Major revision, it'll be published as version "3.00".
The Release state is pretty self-explanatory: a Public release will allow everyone to find and join your map while a Private release will only allow you to host the map and invite friends to it.
The Locked/Unlocked Mode is to let you choose if you want to let people be able to see your map from within the editor.
The Storage is just a general representation of the number of maps you are hosting on Battle.net's server and the size they are taking. Click Manage Files to be able to delete old maps to free some space from your account.
