Difference between revisions of "Cutscene Editor"
m (1 revision: StarEdit.net Wiki) |
|||
| (2 intermediate revisions by 2 users not shown) | |||
| Line 1: | Line 1: | ||
| − | You can get to the | + | You can get to the Cutscene Editor in GalaxyEdit by going to '''Modules > Cutscenes''' of pressing '''"Shift + F7"'''. |
| − | [[File: | + | [[File:CutsceneEditor.jpg]] |
| − | === 1: | + | === 1: Files === |
| − | The | + | The Files window can be shown under '''View > Show Panes > Files''' or by pressing '''"F"'''. This pane has 4 main tabs associated with it: Models, Sounds, Files, and Conversations - everything you should need to create a cutscene or cinematic. Click the plus signs to expand the different folders, and press the minus signs to minimize them. Type in the text box to search for a specific file. Once you have found the files you want, select them, and press '''Add''' to add them to '''Loose Files > (Previewer)''' in the Scene Object List. |
| − | === | + | ==== Model Data ==== |
| − | + | [[File:Modeldata.png]] | |
| − | + | You can look up specific information about a Model by opening the Model Data window. This can be accessed by going to '''Object > Model Data''' or by pressing '''"Shift + D"'''. This is handy if you ever decide you want to look up the model's [[attachment points]] for use in the [[Data Editor]] or the model's textures if you want to use [[Custom Unit Textures]]. | |
| − | |||
| − | === | + | === 2: Scene Object List === |
| − | + | The Scene Object Data List can be shown under '''View > Show Panes > Scene Object Data List''' or by pressing '''"Shift + Y"'''. This pane displays any loose files being previewed as well as any scenes you have created for your map. | |
| + | |||
| + | To add a new scene to your map, right-click in this pane and select "Add Scene". This will create an UntitledScene in the "Document Files" folder. From here you can add models, sounds, and so on to create your scene and eventually link to it via the map's [[Triggers]]. | ||
| + | |||
| + | === 3:Three Model View === | ||
| + | This area displays various cameras that you can use to see your scene. You can modify this area by going to '''View > Show Panes''' and selecting "One Model View", "Two Model View", or "Three Model View" based on how many you'd like to see simultaneously. This can be handy when you want to compare the "Game View" angle with a "User" angle that you can play around with and a "Director" angle set by whichever camera is active on the Timeline. | ||
| + | |||
| + | Note that you can also open up a separate window for just the Director Camera by going to '''Window > Director Window''' or pressing '''"Ctrl + D"'''. | ||
| + | |||
| + | === 4: Properties === | ||
| + | The Properties pane can be shown under '''View > Show Panes > Properties'''. This pane will show detailed information relating to your model in a scene. | ||
| + | |||
| + | === 5: Timeline === | ||
| + | The Timeline can be shown under '''View > Show Panes > Timeline''' or by pressing '''"Shift + T"'''. The timeline shows the various models, cameras, lights, text, and other elements in your scene. If you're just using the Cutscene Editor to preview models, you can right-click on the bar associated with the model on the timeline and change the animation. | ||
| + | |||
| + | For more information, see the [[Creating a Cutscene]] tutorial. | ||
| − | |||
| − | |||
[[Category:StarCraft II]] | [[Category:StarCraft II]] | ||
[[Category:Reference]] | [[Category:Reference]] | ||
Latest revision as of 18:21, 24 March 2013
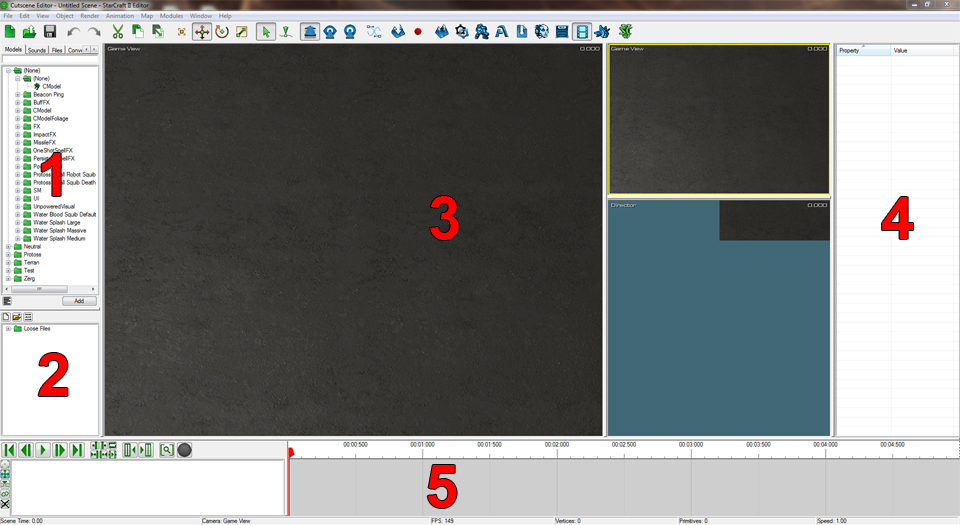
You can get to the Cutscene Editor in GalaxyEdit by going to Modules > Cutscenes of pressing "Shift + F7".
1: Files
The Files window can be shown under View > Show Panes > Files or by pressing "F". This pane has 4 main tabs associated with it: Models, Sounds, Files, and Conversations - everything you should need to create a cutscene or cinematic. Click the plus signs to expand the different folders, and press the minus signs to minimize them. Type in the text box to search for a specific file. Once you have found the files you want, select them, and press Add to add them to Loose Files > (Previewer) in the Scene Object List.
Model Data
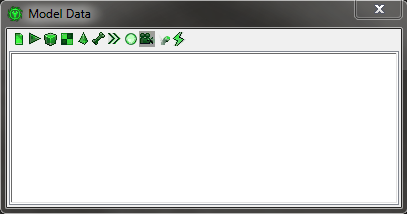
You can look up specific information about a Model by opening the Model Data window. This can be accessed by going to Object > Model Data or by pressing "Shift + D". This is handy if you ever decide you want to look up the model's attachment points for use in the Data Editor or the model's textures if you want to use Custom Unit Textures.
2: Scene Object List
The Scene Object Data List can be shown under View > Show Panes > Scene Object Data List or by pressing "Shift + Y". This pane displays any loose files being previewed as well as any scenes you have created for your map.
To add a new scene to your map, right-click in this pane and select "Add Scene". This will create an UntitledScene in the "Document Files" folder. From here you can add models, sounds, and so on to create your scene and eventually link to it via the map's Triggers.
3:Three Model View
This area displays various cameras that you can use to see your scene. You can modify this area by going to View > Show Panes and selecting "One Model View", "Two Model View", or "Three Model View" based on how many you'd like to see simultaneously. This can be handy when you want to compare the "Game View" angle with a "User" angle that you can play around with and a "Director" angle set by whichever camera is active on the Timeline.
Note that you can also open up a separate window for just the Director Camera by going to Window > Director Window or pressing "Ctrl + D".
4: Properties
The Properties pane can be shown under View > Show Panes > Properties. This pane will show detailed information relating to your model in a scene.
5: Timeline
The Timeline can be shown under View > Show Panes > Timeline or by pressing "Shift + T". The timeline shows the various models, cameras, lights, text, and other elements in your scene. If you're just using the Cutscene Editor to preview models, you can right-click on the bar associated with the model on the timeline and change the animation.
For more information, see the Creating a Cutscene tutorial.

