Difference between revisions of "Map Publishing Tutorial"
(separated this tutorial from the "game attributes" article) |
|||
| (3 intermediate revisions by 3 users not shown) | |||
| Line 1: | Line 1: | ||
| + | This is a general tutorial for all the small things you need to do, before you can publish maps. For each of these things you could find a more complex tutorial, but here you will learn what basic settings to use for most common scenarios. You can find all of this in video tutorial below, but some things changed since the version used in that tutorial. | ||
| + | |||
| + | ===Setting up players=== | ||
| + | [[File:PublishTutorial1.png|400px|thumb]] | ||
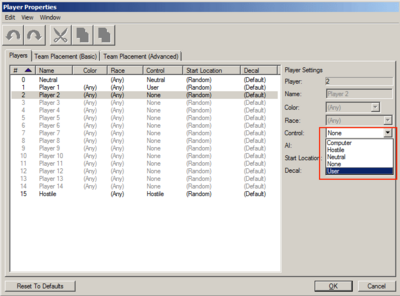
| + | First thing you need to do is choose the number of players that will be able to play your map. Go to '''Map -> Player properties''' and set the ''Controller'' field to ''User'', for each player you want in the game (don't change players 0 and 15), even for computer players, that will be set somewhere else. If you are creating a melee map, you are done and you can skip right to publish step. Otherwise keep reading. | ||
| + | |||
| + | ===Game variants=== | ||
| + | The [[Game Variants|game variants]] function allows you to configure different game modes of your map in the lobby. Even if you want just one game, you still need to configure a default variant. | ||
| + | |||
| + | |||
| + | Open the '''Map -> Game variants''' dialog window. On the left side, there is a list of game variants you have in your map (now it's empty). Uncheck ''Use default variants'' (that is for melee maps). Now click '''Add''' to add a new variant. (Now if you right-click the variant in the list, you can make it ''Default'', but if you only have one, it doesn't matter.) | ||
| + | |||
| + | |||
| + | Now go to the first tab (Game type) and fill in names of Category and Mode ( if you are creating a TD or Tug of War, you can choose it from the dropdown menu, otherwise leave it on Custom and type in your description, such as ''RPG'' or ''Survival''). | ||
| + | |||
| + | |||
| + | Second tab lets you set overall game attributes. I suggest leaving them on defaults and hiding them (on the right side, it's the ''Access'' option, set it to hidden). | ||
| + | [[File:PublishTutorial2.png|400px|thumb]] | ||
| + | |||
| + | |||
| + | Third tab lets you set individual player settings and, more important, teams. First select the number of teams at the very top. Choosing "Locked teams" will prevent game host from modifying teams (number of teams and number of players on each team will be locked), so that is probably what you want. | ||
| + | |||
| + | |||
| + | Next is adding players to teams. When you choose a player in the list, you can edit all of his options. Set player's teams so that there is the correct number of players in each team (player numbers don't matter). Choosing ''Lock players on team'' will make sure that players with correct player IDs will be on selected teams (useful if you have preplaced units on map, and need to make sure that player near each other are allies). If you detect teams using triggers, or don't have any units on map (they are after the game starts), you can leave them unlocked. | ||
| + | |||
| + | |||
| + | However, if you have a computer player that needs to be on a team, lock him on team. Also, to make sure that he is played by a computer, choose ''Computer'' in the ''Controller'' attribute, and lock the setting (in ''Access'' option.) | ||
| + | |||
| + | |||
| + | If you want to lock a player to a specific race, choose the race in the ''race'' attribute and lock it (or, if everyone has the same race, hide it). You can also hide all other attributes you don't use, such as handicap and difficulty (unless you use default AI, it won't do anything anyway). | ||
| + | |||
| + | ===Publishing=== | ||
| + | Now that you have set everything, you can publish the map. Go to '''File -> Publish''', and log in to battle.net. Here you can set a couple more options: | ||
| + | *'''Locked/Unlocked''' - Locked maps can't be easily opened by other users, so check this if you worry about someone stealing your map (if this is your first map, you really don't need to worry about that). | ||
| + | |||
| + | Note: It is possible to unlock locked maps using map cache editing. Don't rely on this method to protect anything. See [[Unlocking Locked Maps]] for more information, and Map Obfuscation for different ways to protect your map, if you so desire. | ||
| + | *'''Private/Public''' - Private maps can only hosted by you, so this is a useful option if this is a test version of the map | ||
| + | *'''Major/Minor release''' - affects only version number of the map, which is generated automatically. | ||
| + | |||
| + | After you set these three options, just click upload and you just published your first map! | ||
| + | |||
| + | ==Video tutorial== | ||
| + | |||
Credits for this video goes to '''OneTwo'''. | Credits for this video goes to '''OneTwo'''. | ||
<youtube>aQp3irTx25o</youtube> | <youtube>aQp3irTx25o</youtube> | ||
Latest revision as of 00:40, 14 May 2011
This is a general tutorial for all the small things you need to do, before you can publish maps. For each of these things you could find a more complex tutorial, but here you will learn what basic settings to use for most common scenarios. You can find all of this in video tutorial below, but some things changed since the version used in that tutorial.
Setting up players
First thing you need to do is choose the number of players that will be able to play your map. Go to Map -> Player properties and set the Controller field to User, for each player you want in the game (don't change players 0 and 15), even for computer players, that will be set somewhere else. If you are creating a melee map, you are done and you can skip right to publish step. Otherwise keep reading.
Game variants
The game variants function allows you to configure different game modes of your map in the lobby. Even if you want just one game, you still need to configure a default variant.
Open the Map -> Game variants dialog window. On the left side, there is a list of game variants you have in your map (now it's empty). Uncheck Use default variants (that is for melee maps). Now click Add to add a new variant. (Now if you right-click the variant in the list, you can make it Default, but if you only have one, it doesn't matter.)
Now go to the first tab (Game type) and fill in names of Category and Mode ( if you are creating a TD or Tug of War, you can choose it from the dropdown menu, otherwise leave it on Custom and type in your description, such as RPG or Survival).
Second tab lets you set overall game attributes. I suggest leaving them on defaults and hiding them (on the right side, it's the Access option, set it to hidden).
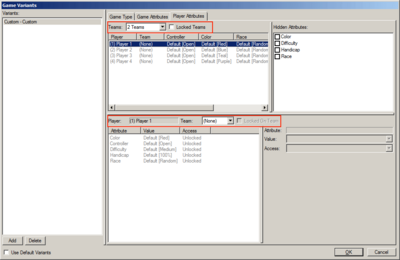
Third tab lets you set individual player settings and, more important, teams. First select the number of teams at the very top. Choosing "Locked teams" will prevent game host from modifying teams (number of teams and number of players on each team will be locked), so that is probably what you want.
Next is adding players to teams. When you choose a player in the list, you can edit all of his options. Set player's teams so that there is the correct number of players in each team (player numbers don't matter). Choosing Lock players on team will make sure that players with correct player IDs will be on selected teams (useful if you have preplaced units on map, and need to make sure that player near each other are allies). If you detect teams using triggers, or don't have any units on map (they are after the game starts), you can leave them unlocked.
However, if you have a computer player that needs to be on a team, lock him on team. Also, to make sure that he is played by a computer, choose Computer in the Controller attribute, and lock the setting (in Access option.)
If you want to lock a player to a specific race, choose the race in the race attribute and lock it (or, if everyone has the same race, hide it). You can also hide all other attributes you don't use, such as handicap and difficulty (unless you use default AI, it won't do anything anyway).
Publishing
Now that you have set everything, you can publish the map. Go to File -> Publish, and log in to battle.net. Here you can set a couple more options:
- Locked/Unlocked - Locked maps can't be easily opened by other users, so check this if you worry about someone stealing your map (if this is your first map, you really don't need to worry about that).
Note: It is possible to unlock locked maps using map cache editing. Don't rely on this method to protect anything. See Unlocking Locked Maps for more information, and Map Obfuscation for different ways to protect your map, if you so desire.
- Private/Public - Private maps can only hosted by you, so this is a useful option if this is a test version of the map
- Major/Minor release - affects only version number of the map, which is generated automatically.
After you set these three options, just click upload and you just published your first map!
Video tutorial
Credits for this video goes to OneTwo. <youtube>aQp3irTx25o</youtube>

