Custom Unit Textures
There are a few ways in which you can change the textures used on a unit.
- The first method simply replaces the existing default texture with another one.
- The second method uses the Data Editor to change the texture of the Actor.
- The third method uses the Trigger Editor to change the catalog entry of a unit.
Replacement Method
First, export the texture from the MPQ. In this case, we'll be using the "Protoss Dark Templar" textures, and we'll be editing the diffuse map, and the emissive map.
This is found in the Liberty.SC2Mod folder, in the base.SC2Assets MPQ. Navigate into Assets/Textures/ and put a search mask for dark*. As you should be able to see, there's a .dds called darktemplar_diffuse.dds. So, of course, we export that, edit it, and place it into our map, right? WRONG. If you tried this, nothing would change.
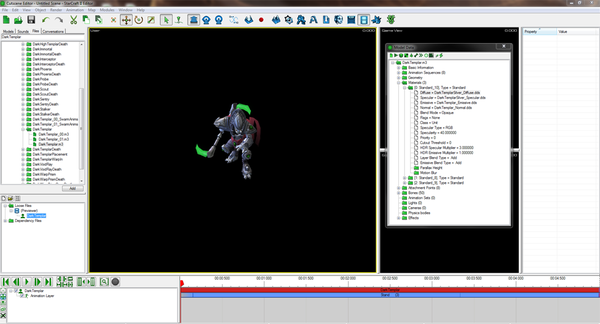
Instead, open up the Cutscene Editor. Navigate to the Dark Templar unit, and take a look at the materials the .m3 looks for in the Model Data window. As seen in the screenshot, it looks for the DarkTemplarSilver_Diffuse.dds. Not all units are like this, but it's a good idea to make sure you're trying to replace the correct file.
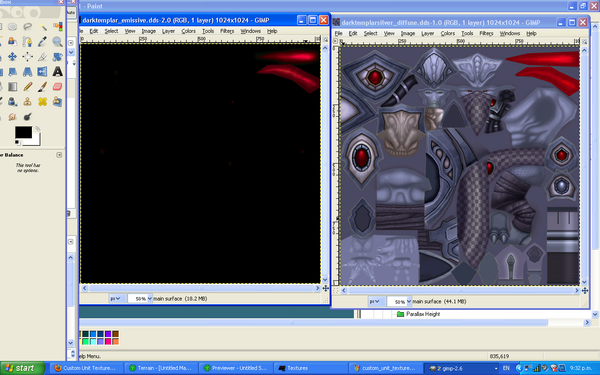
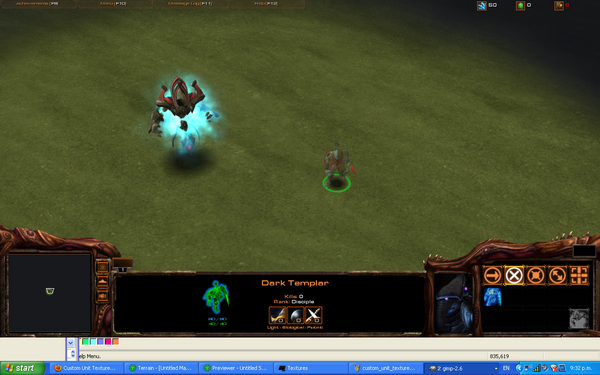
Now, back in your MPQ editor, export DarkTemplarSilver_Diffuse.dds and DarkTemplar_emissive.dds now that we know these are the correct textures to replace. Open them up in your image editor, and modify it however you want. In this case, I've made the blades glow red, by editing the emissive map. I've also edited the diffuse map to make other parts of the Dark Templar redder.
Finally we will replace the texture in GalaxyEdit. Open up the Import module (F9), and go to Data > Import Files (Ctrl + I). Navigate to your textures, select them, and import them. Make sure they're in Assets/Textures/ inside the map. Save the map, and exit the importer.
Now place a Dark Templar or three in the terrain module, and go test them out! (Note: The changes won't show up in the editor with this method, as the editor seems to look in the Liberty mod for this information when you use the replacement method. However, they should show up fine in-game).
Data Editor Method
Step 1: Cutscene Editor
Open the Cutscene Editor (Shift + F7). First, make sure the "Files" pane is visible by going to View > Show Panes > Files or by pressing "F". Now click on the "Files" tab. In the textbox underneath the tabs, you can search for whichever model you want to specifically change. In this case, let's change the Reaper. Search for "Reaper" and double-click on Reaper.m3 in the Assets > Units > Terran > Reaper folder. Make sure the "Scene Object List" is open as well by going to View > Show Panes > Scene Object List or pressing Shift + Y.
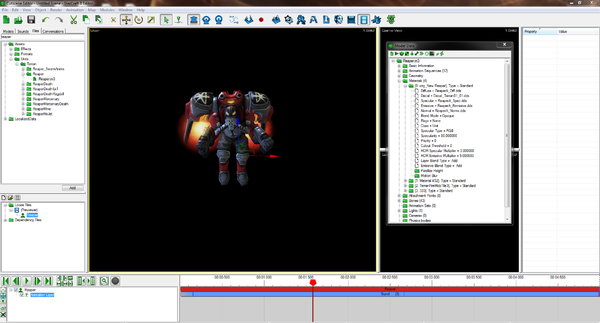
Under "Loose Files > Previewer" you should see "Reaper". Select it. Now let's open the "Model Data" window by going to Object > Model Data or pressing Shift + D. This window will show us everything we need to change the unit's textures.
Click on the + sign next to the "Materials" folder. This should now show us the "[0: orig_New Reaper], Type = Standard" folder. In this folder, we can see all the default textures being used for the Reaper as well as other information. Note that the other folders will show us the textures related to the jetpack, but for now let's focus on the main part of the unit. Make note of the values next to "Diffuse", "Normal", and "Emissive" as they will be important later.
Step 2: Models
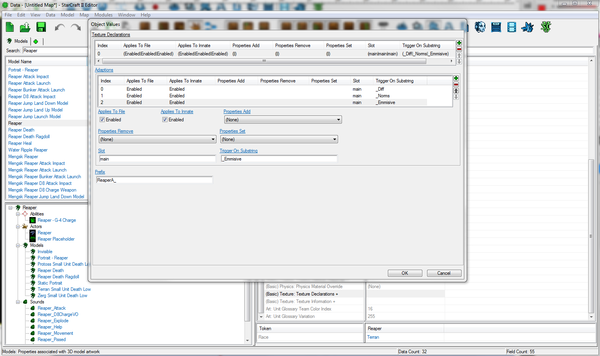
Now open the Data Editor (F7). Go to the "Models" tab and search for the "Reaper". Once selected, make sure "Table View" is enabled for the sake of finding things quickly. Now find the "(Basic) Texture: Texture Declarations+" field on the right, and double-click the empty space next to it to open an Object Values window.
In the box under "Texture Declarations", right-click and select "Add Value" or click the green + on the right. With this new Texture Declaration selected, the "Adaptions" box is now active.
Right-click the box under "Adaptions" and select "Add Value" or click the green + on the right. Select "Add Value" or click the box 2 more times so we have indexes 0, 1, and 2.
- Select index "0" under "Adaptions" and under "Prefix" type "ReaperA_". This Prefix will be applied to all the Adaption indexes, and because all of our unit's textures start with "ReaperA_" we will only need to input this once. Supposing you have a unit with multiple prefixes, you'll need to add new Texture Declarations for each one. Luckily we don't have to worry about that here. Now type "main" under "Slot" and "_Diff" under "Trigger On Substring". This now matches "Diffuse = ReaperA_Diff.dds" from the Model Data in the Cutscene Editor.
- Select index "1" under "Adaptions", and again type "main" under "Slot". In the "Trigger On Substring" field, type in "_Norms".
- Select index "2" under "Adaptions", and again type "main" under "Slot". In the "Trigger On Substring" field, type in "_Emmisive" (apparently someone misspelled the file name on Blizzard's end).
Step 3: Textures
Go the the "Textures" tab and add a new Texture by right-clicking and selecitng "Add Texture..." or pressing Ctrl + =. Change the Name: to "ReaperA_Diffuse". Click Suggest, and leave the Parent: as "CTexture". Find the "(Basic) Slot" field and change that to "main.diff". Find the "(Basic) File" field and set the filepath to "Assets\Textures\xelnagarelic_diffuse.dds" (or whatever you'd like the Diffuse texture to be).
Add another texture. Change the Name: to "ReaperA_Normal", click Suggest, and leave the Parent: as "CTexture". Find the "(Basic) Slot" field and change that to "main.norms". Find the "(Basic) File" field and set the filepath to "Assets\Textures\castanar_cliff0_normal.dds" (or whatever you'd like the Normal texture to be).
Add one more texture. Change the Name: to "ReaperA_Emissive", click Suggest, and leave the Parent: as "CTexture". Find the "(Basic) Slot" field and change that to "main.emmisive". Find the "(Basic) File" field and set the filepath to "Assets\Textures\aiurprotossbuildings_emissive.dds" (or whatever you'd like the Emissive texture to be).
Step 4: Actors
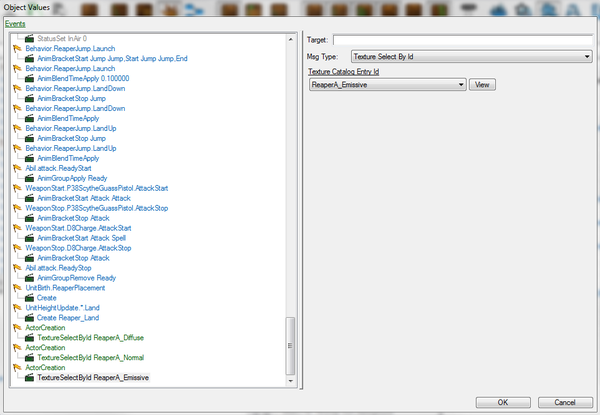
Go to the "Actors" tab and search for the "Reaper". Once selected, find the "Events - Events+" field on the right and double-click it to open an Object Values window.
- Right-click in the box on the left and select "Add Event". Change the Msg Type: of the Event to "ActorCreation". Now change the next Msg Type: to "Texture Select By Id" and the Texture Catalog Entry Id to "ReaperA_Diffuse".
- Right-click in the box on the left and select "Add Event". Change the Msg Type: of the Event to "ActorCreation". Now change the next Msg Type: to "Texture Select By Id" and the Texture Catalog Entry Id to "ReaperA_Normal".
- Right-click in the box on the left and select "Add Event". Change the Msg Type: of the Event to "ActorCreation". Now change the next Msg Type: to "Texture Select By Id" and the Texture Catalog Entry Id to "ReaperA_Emissive".
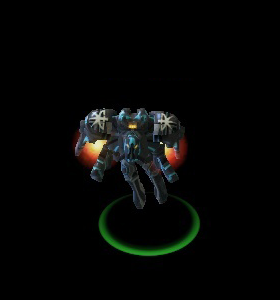
Now when a Reaper is created, it will have all the textures we set by default. The below picture shows the outcome, though the example textures used don't quite do it justice. Experiment with different emissive and diffuse textures to really come up with something amazing looking. Also note that you can use "TextureSelectById" as a result of other events as well, like a Behavior, during an Ability, and so on if you want to give your units an added change.
Trigger Method
The trigger method to swapping textures is almost identical to the above Data Editor method. This can be used as an alternative, however, if you want to swap a unit's texture as the result of or during a trigger.
First start by completing steps 1, 2, and 3 of the Data Editor method. Next open the [Trigger]] Editor (F6) and create a new trigger with all the Events and Conditions you need in order to trigger the change in unit texture.
Now create a new Action (Ctrl + R). Under "Label" click on "Actor". Now find and double-click on the "Send Actor Message" action.
- Set the Message: to Msg Type: "Texture Select By Id" and the "Texture Catalog Entry Id" to whichever changed texture you want to add (i.e. ReaperA_Diffuse if you followed the above examples).
- Set the Actor: to whichever actor you are looking to modify. The easiest method is most likely selecting the Function "Actor From Unit" and then selecting the unit based on it's placement on the map or any variable you may have used to create it.
You've now created a trigger that will change the unit's texture.
