Difference between revisions of "Creating an Inventory System"
| Line 12: | Line 12: | ||
==Creating the Item Container== | ==Creating the Item Container== | ||
| − | The '''Item Container''' will contain all the items our unit will pick up. Under "Data Type:" select "'''Item Containers'''." In the box on the left, right-click and select "'''Add Object'''" (Ctrl+=). Name this new object "Hero Equipment," click "Suggest" for the ID, and then click "OK" to close the window. | + | The '''[[Item containers|Item Container]]''' will contain all the items our unit will pick up. Under "Data Type:" select "'''Item Containers'''." In the box on the left, right-click and select "'''Add Object'''" (Ctrl+=). Name this new object "Hero Equipment," click "Suggest" for the ID, and then click "OK" to close the window. |
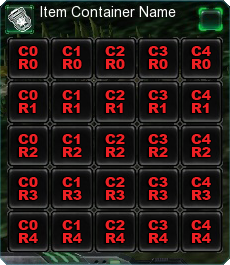
[[File:ItemContainerRows.png|thumb|right|The Column and Row values act as a grid when you open your Item Container. Both values start at "0" and at the top left of the in-game window.]] | [[File:ItemContainerRows.png|thumb|right|The Column and Row values act as a grid when you open your Item Container. Both values start at "0" and at the top left of the in-game window.]] | ||
#In the box on the right, find "Model" and change that to "'''Marine'''." | #In the box on the right, find "Model" and change that to "'''Marine'''." | ||
Revision as of 17:14, 11 May 2011
An inventory system can be created in StarCraft II in two ways: with the Data Editor or with Triggers. Creating the system with the Data Editor is much simpler and much less time consuming, but ultimately less customizable than doing it with Triggers. The purpose of an inventory is to give Items to a unit that will buff him/her. Items could be as simple as adding armor or a weapon, or as complex as adding new Effects to your unit. In this case, we'll keep it simple and make an inventory for a weapon and a piece of armor, and attach it to a Marine.
The Data Editor Method
In this section, we will only be using the Data Editor to create the inventory of our unit. Open up the Data Editor by going to "Modules > Data" (F7). Before we begin, make you have the "Show Table View" button pressed next to the right "Search" bar.
Creating the Item Classes
Before we can set up our inventory, we need to decide what types of items the unit can pick up. Item Classes are basically customized item types that will be attached to the item units. Under "Data Type:" select "Item Classes."
- In the box on the left, right-click and select "Add Object" (Ctrl+=). Name this new object "WeaponClass," click "Suggest" for the ID, and then click "OK" to close the window.
- Right-click and select "Add Object" (Ctrl+=) again. Name this new object "ArmorClass," click "Suggest" for the ID, and then click "OK" to close the window.
That's all you have to do here. If you wanted a more complex inventory system that had different types of armor or accessories, you would need to make an Item Class for each one as well. For now, we'll be fine with just two, though.
Creating the Item Container
The Item Container will contain all the items our unit will pick up. Under "Data Type:" select "Item Containers." In the box on the left, right-click and select "Add Object" (Ctrl+=). Name this new object "Hero Equipment," click "Suggest" for the ID, and then click "OK" to close the window.
- In the box on the right, find "Model" and change that to "Marine."
- Now change the "Model Height" and "Model Width" values to "300."
- Find "Slots+" and double-click the space to the right of it. This will open up an "Object Values" window that allows you to set the various slots that will display when you open up your Item Container.
- Click the green X on the right to add a line to the "Slots" box. With this line selected, click the green X under "Classes" to add a new line to that box as well. Select the new line under "Classes" and change that to "ArmorClass."
- Change the value under "Column" to "0."
- Change the value under "Row" to "2."
- Check the box next to "Enabled" under "Equip."
- Click "OK" to close the window.
- Click the green X on the right of the "Slots" box again to add a new line. With this new line selected, click the green X under "Classes" to add a new line to that box as well. Select the new line under "Classes" and change that to "WeaponClass."
- Change the value under "Column" to "5."
- Change the value under "Row" to "2."
- Check the box next to "Enabled" under "Equip."
- Click "OK" to close the window.
- Click the green X on the right to add a line to the "Slots" box. With this line selected, click the green X under "Classes" to add a new line to that box as well. Select the new line under "Classes" and change that to "ArmorClass."
Creating the Inventory Button
We need a button to click to open the inventory window, so we should make a custom button for this purpose. Under "Data Type:" select "Buttons." In the box on the left, right-click and select "Add Object" (Ctrl+=). Name this new object "Hero Equipment," click "Suggest" for the ID, and then click "OK" to close the window.
- In the box on the right, find "Icon" and change that to "btn-techupgrade-terran-combatshield.dds." You can change this to whatever you would like, but I figured an image of a shield was appropriate.
- Find "Tooltip" and change that to something along the lines of "Contains the hero's gear."
Normally you would want to add a hotkey to a button, but in this case it isn't necessary as it wont be used.
Creating the Inventory Ability
In order to attach the Item Container to the unit, we need to create an ability that can be given to our unit. Under "Data Type:" select "Abilities." In the box on the left, right-click and select "Add Object" (Ctrl+=). Name this new object "Hero Equipment," set the "Type:" to "Inventory," click "Suggest" for the ID, and then click "OK" to close the window.
- In the box on the right, find "Ability - Info+" and double-click the space on the right of it to open an "Object Values" window.
- Click the green X on the right to add a line to the box under "Info."
- With this line selected, change the "Container" to "Hero Equipment."
- Change the "Empty Face" to our new inventory button, "Hero Equipment."
- Under "Classes" click the green X on the right of the box and add our two custom classes, "WeaponClass" and "ArmorClass."
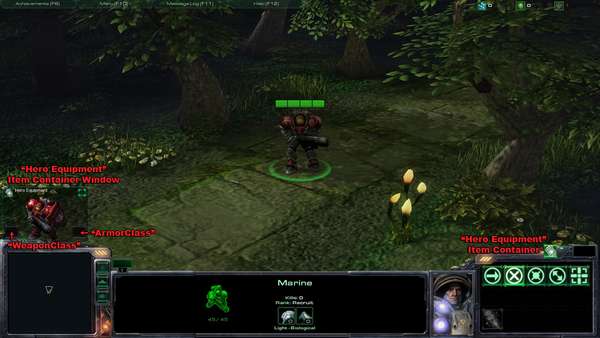
- Change the "Alignment" to "Left" or "Right." Basically this manages where the in-game item container window displays above the default UI. In the screenshot below, this is set to "Left."
- Click "OK" to close the window.
- Now find "Maximum Drop Range" and set that value to "2."
- Also find "Minimum Drop Range" and set that value to "2" as well.
Attaching the Inventory to a Unit
Now all we need to do is attach the inventory ability to our unit. Under "Data Type:" select "Units," and find the "Marine."
- In the box on the right, find "Ability - Abilities+" and double-click the value next to it to open an "Object Values" window.
- Click the green X on the right to add a new line to the "Abilities" box. Select that line and change it to "Hero Equipment."
- Click "OK" to close the window.
Congratulations, your Marine can now equip items. In the future, you could add another "Item Container" to him as an all-purpose inventory as well. Then you would be able to drag items from that container to the "Hero Equipment" to equip them on the unit.
See Also
Video Tutorial
Credits for this video goes to OneTwo. <youtube>0ZH8Bx9jtcs</youtube>

